
Thursday, May 14, 2015
Anyone have this stamp they want to part with???? Hoping to win some Sugar Nellie Digis!!
I made this cute card with a stamped image of Sugar Nellie Daisy. I'm entering it in a contest hoping to win some free digi stamps on The Sugar Bowl challenge blog!

Saturday, December 6, 2014
Fantastic Christmas Ornaments!!
I made some floating ornaments, and some glittered ornaments to sell at local craft shows and I LOVE, LOVE, LOVE how they turned out!!!


Friday, September 26, 2014
Boo Crew Halloween FB Hop September 27 & 28
Welcome everyone to The Boo Crew Halloween FB Hop. We will be showcasing Craftin Desert Divas Stamps, KaDoodle Bug Designs and Too Cute By Jessica
patterns. Are you ready for a spooktacular hop? Our DT ladies have some
frightfully cute creations to share with you.Of course our hop has some
AMAZING sponsors! We have some freebie patterns too, you have
to hop to find the link to the freebie patterns. CDD, KBD and TCBJ are
all having SALES this weekend! There are also 2 special discount codes
below to use during this hop.
The prizes up for grabs are:KBD - 2 - $15 GC. TCBJ - $30 GC. Craftin Desert Divas - One stamp set each day of hop.Stamp N Storage - $50 GC. Therm O Web - $25.00 Gift Card. Spectrum Noir - 2 six-pack of Spectrum Noir Markers. Xyron - 5" Create-a-Sticker Max valued at $28. Magnolia-licious - Surprise PackDies R Us - $10 GC. SRM Stickers - Halloween Stickers. Clear Snap - 3 Winners of Crafty Goodies. Really Reasonable Ribbon - Halloween Prize. Wow Embossing Powder - 2 winners. Lovebug Creations - $10 GC. Kathy's Cozies - $20 Off shopping spree. Vinyl Outlet - Pack of vinyl for 3 Winners!! Fleurette Bloom $10 GC. Tombow - Use Code: Fall20 to get a 20% discount valid 9/27 - 9/30. Pumpkin Spice - $20 GC. Kraft Outlet - Mystery Pack full of Kraft Outlet items valued at $20 Use Code: BLOGHOP to save 10%. To win these prizes all you have to do is comment on the projects in the hop. We will pick winners from different FB pages. So the more you comment the more chances for you to win. We would love for you to "like" our FB pages, but it's NOT a requirement. We want you to enjoy this hop and join us for our future hops.
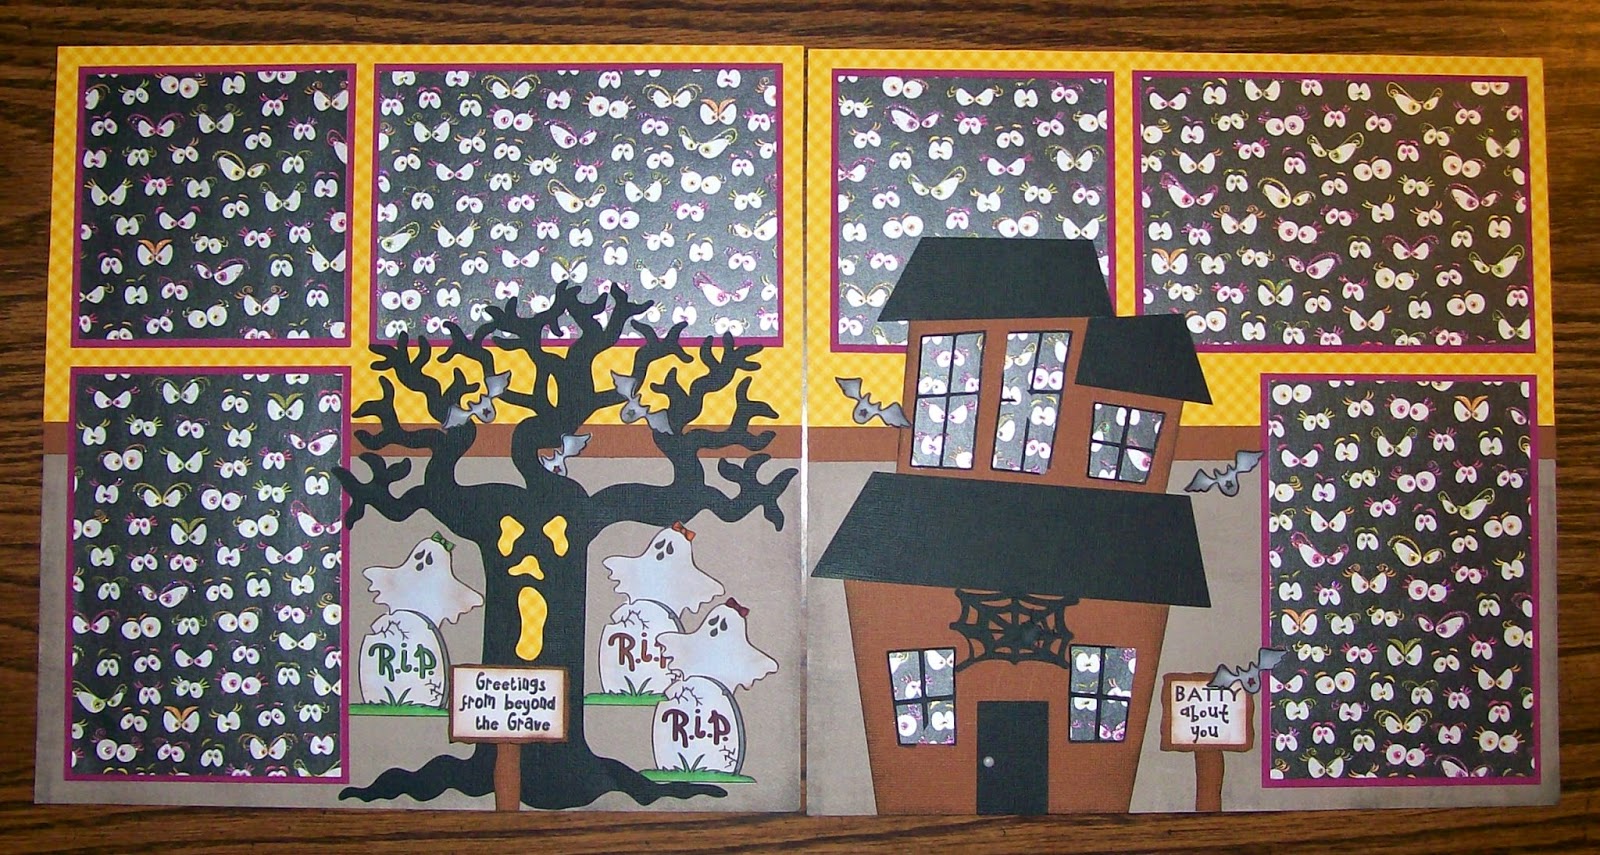
For today I've created: This 2 page layout using the tree from TCbJ Boo Fun and the haunted house from TCbJ Trick or Treat file. They can be found here: http://www.toocutebyjessica.com/category_14/2/Halloween.htm The stamps are from CDD Batty For You set. It can be found here: http://www.craftindesertdivasshop.com/category_26/Halloween.htm

I also created a couple cards and a doorknocker (I think that's what it's called! lol) for todays hop using the same CDD stamp set I used above. The ghosts are from KBD Spooktacular Ghosts 1 & 2 that can be found here: http://kadoodlebugdesigns.com/shop/index.php?main_page=advanced_search_result&search_in_description=1&zenid=512e481f8507988df894f1006a093b28&keyword=spooktacular+ghosts


I hope you enjoyed my projects, and would love for you to leave me a comment telling me what you think about them! Also, I'd love to have you become a follower on my blog. Have a great day and hop on over to the talented Krystal, who is next on the hop line up http://www.facebook.com/
If you should get lost there is a complete line up on the CDD FB page. https://www.facebook.com/CraftinDesertDivas
The prizes up for grabs are:KBD - 2 - $15 GC. TCBJ - $30 GC. Craftin Desert Divas - One stamp set each day of hop.Stamp N Storage - $50 GC. Therm O Web - $25.00 Gift Card. Spectrum Noir - 2 six-pack of Spectrum Noir Markers. Xyron - 5" Create-a-Sticker Max valued at $28. Magnolia-licious - Surprise PackDies R Us - $10 GC. SRM Stickers - Halloween Stickers. Clear Snap - 3 Winners of Crafty Goodies. Really Reasonable Ribbon - Halloween Prize. Wow Embossing Powder - 2 winners. Lovebug Creations - $10 GC. Kathy's Cozies - $20 Off shopping spree. Vinyl Outlet - Pack of vinyl for 3 Winners!! Fleurette Bloom $10 GC. Tombow - Use Code: Fall20 to get a 20% discount valid 9/27 - 9/30. Pumpkin Spice - $20 GC. Kraft Outlet - Mystery Pack full of Kraft Outlet items valued at $20 Use Code: BLOGHOP to save 10%. To win these prizes all you have to do is comment on the projects in the hop. We will pick winners from different FB pages. So the more you comment the more chances for you to win. We would love for you to "like" our FB pages, but it's NOT a requirement. We want you to enjoy this hop and join us for our future hops.
For today I've created: This 2 page layout using the tree from TCbJ Boo Fun and the haunted house from TCbJ Trick or Treat file. They can be found here: http://www.toocutebyjessica.com/category_14/2/Halloween.htm The stamps are from CDD Batty For You set. It can be found here: http://www.craftindesertdivasshop.com/category_26/Halloween.htm
I also created a couple cards and a doorknocker (I think that's what it's called! lol) for todays hop using the same CDD stamp set I used above. The ghosts are from KBD Spooktacular Ghosts 1 & 2 that can be found here: http://kadoodlebugdesigns.com/shop/index.php?main_page=advanced_search_result&search_in_description=1&zenid=512e481f8507988df894f1006a093b28&keyword=spooktacular+ghosts
I hope you enjoyed my projects, and would love for you to leave me a comment telling me what you think about them! Also, I'd love to have you become a follower on my blog. Have a great day and hop on over to the talented Krystal, who is next on the hop line up http://www.facebook.com/
If you should get lost there is a complete line up on the CDD FB page. https://www.facebook.com/CraftinDesertDivas
Thursday, September 11, 2014
LOOK NEW Layouts!
I just thought I would share these new layouts made from cute Kadoodle Bug Designs files. You can find the files I used to make these layouts as well as so many other cute files at: http://kadoodlebugdesigns.com/shop/


Saturday, August 30, 2014


Tuesday, August 26, 2014
How I Paper Piece with a jpeg file
Sometimes I just don't feel like setting up the file to cut and cutting out all the pieces. Also, I am doing this little tutorial for beginners to paper piecing that don't have the option to cut individual pieces with an electronic cutter, or that do not want to print the pdf (Adobe file) and hand cut all the pieces. This is what the pdf (Adobe) file looks like. You simply print it out, cut out the pieces, then cut them out of colored cardstock the color you want them. I do think that some Adobe files are in color so you could print them out and just cut those pieces out and glue them together to make your project, but I'm not positive on that. I apologize for the print quality I forgot to print this out so I just took a pic of the computer screen.

Okay, back to the jpeg file. I'm using the Cute As Can Be File from KaDoodle Bug Designs, and the file can be found here: http://kadoodlebugdesigns.com/shop/index.php?main_page=product_info&cPath=3&products_id=374
Step 1: I print out 2 pics of the jpeg file I want to use the same size. Always check the file description when you buy a file to be sure that it comes with a printable file. Some files do not come with a printable file. Always save all the other files as well because you never know when you will get a new cutter and need a different type of file for a new machine! :)


Step 4: Attach your cut out piece to your project. This is optional of course, and if I'm doing a layout I don't attach the pieces until I have them all done. For cards I find it easier to just go ahead and attach it now.

Step 5: Attach the pieces to the top of the same piece on first pic you cut out with pop dots. They will add dimension to your project. I used black pen a lot of places I would normally use white so that the lines showed up. This is also a more intricate pic, but it doesn't have to be. I could have just pop dotted the planter, heart flowers, bees, heart antenneas, and the arm and hand. It still would have been cute with only a few things popped up!


Step 6: Mail the card to someone to give them a smile!
Here are a couple made with the simpler pic. The pink one has just 7 things popped up, and the green one doesn't have any popped up. I have a slight addiction to bling! lol I hope this tutorial helps!

Step 1: I print out 2 pics of the jpeg file I want to use the same size. Always check the file description when you buy a file to be sure that it comes with a printable file. Some files do not come with a printable file. Always save all the other files as well because you never know when you will get a new cutter and need a different type of file for a new machine! :)
Step 2: Cut out one of the pics. Sometimes the pics have a lot of intricate cuts like the first page, so I just cut around the outside and leave some of the white show. Other times they are a lot simpler to cut out such as pic two. However, I always seem to need my xacto/craft/hobby knife to get in to the tight spots!
Step 3: Cut out the pieces from the second pic that you want to attach to the first one you cut out with pop dots. Select as many or as few as you want. It's all about what you like. There is no right or wrong in scrapbooking and card making! After you get them cut out, if you choose to, add all your little white gel pen or black acid free pen marks on the pieces where you want them. It's easier to do them now than to do them once they are sitting on a pop dot! :) Also you can add any gems, googley eyes, etc to them as well.
Step 5: Attach the pieces to the top of the same piece on first pic you cut out with pop dots. They will add dimension to your project. I used black pen a lot of places I would normally use white so that the lines showed up. This is also a more intricate pic, but it doesn't have to be. I could have just pop dotted the planter, heart flowers, bees, heart antenneas, and the arm and hand. It still would have been cute with only a few things popped up!
Step 6: Mail the card to someone to give them a smile!
Here are a couple made with the simpler pic. The pink one has just 7 things popped up, and the green one doesn't have any popped up. I have a slight addiction to bling! lol I hope this tutorial helps!
Thursday, August 21, 2014
August 22-24 Blog Hop with Kiwi Lane

The accessory set that I was asked to design with was the Playtime set. It's a super fun set! I made a couple layouts actually, and then posted my favorite here on the hop! The rocket template was so much fun to work with. It started out a plain blue piece of paper shaped like a rocket, and then I got creative! :) I decided to add a couple stripes of the paper I used in the layout around the bottom of it. Well, it still needed something, so I added the lettering. Still, it seemed to me that it could use a little help popping off the page. I had bought the cool starburst brads to use on this layout, and decided to add one to each rocket too. Once I added the little white stitch lines with my gel pen it looked perfect to me! I hope you like my layout as much as I do, but if not, I added my adorable grandson Keegan the day he was born, and who doesn't love a precious newborn baby! lol Thanks for stopping by, and make sure you leave a comment and let me know what you think! It will also get you an entry into the drawing for a $25 Kiwi Land Designs Gift Card, and who wouldn't LOVE to have that! I'd love to have you become a follower of my blog as well!


Now that you've seen my layout, left me a comment, and hopefully became a follower of my blog as well, it's time to see what else was created for you to see! Hop on over to Alicia's blog ( http://
1. Kiwi Lane Designs www.kiwilane.com/blog
2. Barb http://
3. Alicia http://
4. Charity http://
5. Gail http://
6. Connie Wallenbrock http://
7. Brittany (http://
8. Christina: http://
9. Erica: http://
Subscribe to:
Posts (Atom)